Cats are one of the most popular pets effectually the earth, and they are incredibly smart creatures. With their vivid eyes, perky ears, and playful tails, cats make wonderful subjects for cartoon. Whether you are a true cat person or a dog person, there is so much that you tin learn and practice by drawing a true cat, including proportions, perspective, and fur detailing. In this tutorial, we evidence you how to draw a tabby cat. If you lot would like to render your own furry friend in your realistic cat cartoon, you tin can easily adapt the colour pattern in the last few steps. If you lot are ready to learn how to draw a cat, then gather your supplies, get comfy, and let united states dive right in!
Table of Content
- i How to Describe a Realistic Cat Step-past-Stride
- ane.one Footstep 1: Constructing the True cat'due south Main Body
- i.2 Footstep 2: Constructing the Cat'south Head
- one.3 Step iii: Constructing the Cat's First Front Leg
- 1.4 Step 4: Constructing the Cat'south Second Front Leg
- 1.5 Step 5: Constructing the Cat's Beginning Back Leg
- 1.6 Step vi: Constructing the Cat's 2nd Back Leg
- i.7 Step seven: Constructing the Cat'southward Tail
- one.8 Step 8: Drawing Your Cat'southward Ears
- 1.ix Step ix: Fine Lining the Outline of Your Cat Cartoon
- 1.ten Step 10: Calculation Texture and Details
- 1.11 Stride xi: Adding the Get-go Coat of Color
- i.12 Step 12: Adding the Second Glaze of Color
- i.13 Footstep 13: Blending Shades and Adding the Tertiary Glaze of Colour
- 1.14 Pace 14: Adding the Tabby Stripes
- 1.15 Step 15: Calculation Highlights
- 1.16 Step xvi: Calculation Shading
- 2 Frequently Asked Questions
- two.one Does It Have a Lot of Time to Make a True cat Drawing?
- ii.2 Can Y'all Utilize Paint to Complete this Tutorial?
How to Draw a Realistic Cat Stride-by-Stride
We honey cats, what is in that location not to honey? Cats brand wonderful companions simply they are besides highly individual and look after themselves. Agile and elegant, cats take impeccable balance thanks to their long tails. Cats tin also squeeze through very small spaces, and they determine whether they can fit with the highly sensitive whiskers on their faces and the back of their forepart legs. Cats also walk in a very unique mode, with giraffes being the only other mammals that move both correct feet first and then both left anxiety.
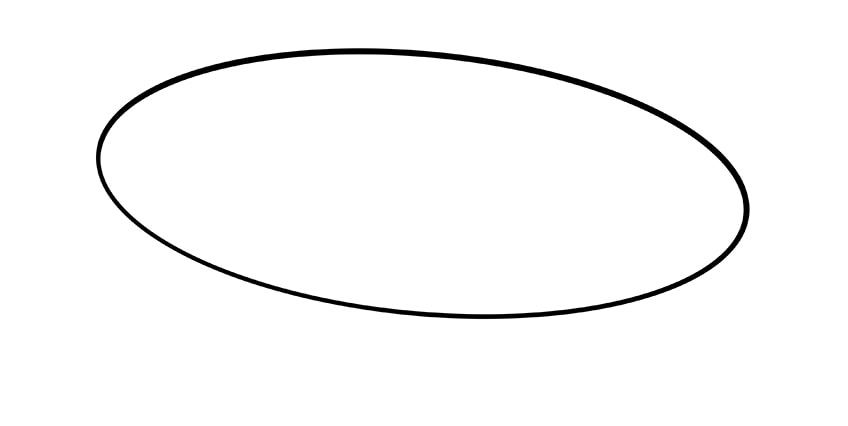
Step 1: Constructing the Cat'due south Master Body
If you lot accept followed whatever of our othercreature drawing tutorials, you will know that we always start by using structure lines. Structure lines are incredibly helpful for any artist, whether y'all are an accomplished artist or a beginner. Starting a drawing with construction shapes and lines is a swell way to make certain your dimensions are perfect before y'all start calculation details. For our cat drawing, nosotros are going to brainstorm with an elongated oval shape. Ideally, this oval should be slightly angled down towards the right.
The almost important part of this first step is to make certain that your oval is in the heart of your canvas. There are many other elements to the true cat, including the head, tail, and legs, that you will draw in the next few steps and these need plenty of space.
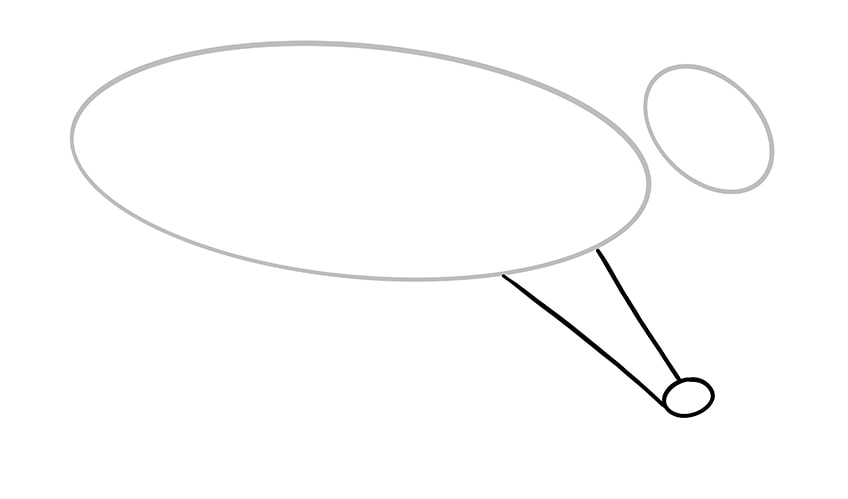
Footstep 2: Constructing the Cat'south Head
In this 2d stride, you are going to utilize another structure oval to represent the caput of your drawing of a true cat. The head oval should be much smaller than the body oval y'all drew in the concluding step, and it should be more steeply angled downwardly to the right.
You lot want to place this head oval at the front of the cat'due south body oval, merely y'all exercise not want the two to touch or overlap.

Stride three: Constructing the Cat'due south First Front Leg
The side by side part of the true cat'south body you lot need to construct is the front leg. The leg we are starting with is the front leg that is furthest away from u.s.. Because of this perspective, yous tin brainstorm the lines for the leg correct on the torso oval. At the bottom of the main body oval, merely behind the front bespeak, draw two straight lines that extend out toward the front. You lot want the two lines to get closer together every bit they become to the bottom.
At the lesser of this leg, depict a small oval angled upward. Yous will utilize this oval to draw the cat'due south paw in later steps.
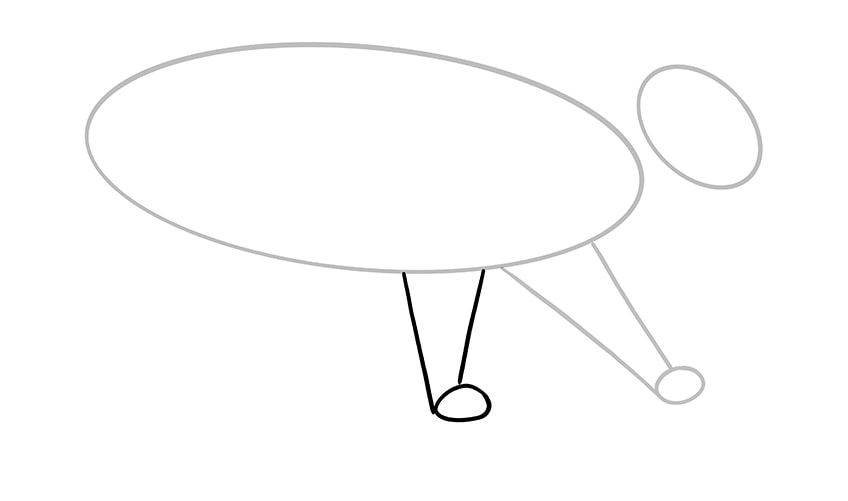
Pace iv: Constructing the Cat's Second Front Leg
In this fourth pace, apply the same process that you did for pace three. For this front leg, still, you lot need to describe the lines straight down, rather than facing forward. Add together a little uneven circle at the bottom of this leg to correspond the hand.
Step 5: Constructing the Cat'due south First Back Leg
This stride and the next focus on drawing the first back leg in your cartoon of a true cat. Begin this back leg just in front of the back of the trunk oval. Draw a foursquare "U" shape that faces the back. The cat's dorsum legs have a knee joint, so it is easier to describe this leg in two stages. This first construction shape is going to correspond the cat's thigh.
 To consummate the lesser of this dorsum leg, draw two lines that are slightly angled towards the back and terminate the leg with a rotated uneven circle.
Hopefully you tin can now see the shape of the back leg, and in the next few steps nosotros will start to flesh it out.

Stride 6: Constructing the Cat's 2d Dorsum Leg
For the 2d dorsum leg, you are going to follow the same basic steps that y'all did for the first dorsum leg. Start with some other foursquare "U" shape, but describe this one facing direct downward rather than to the back. Yous want to make certain that the rear line of this "U" shape begins on the "U" shape of the other back leg, to capture the right perspective.

To finish this terminal back leg, y'all are going to utilise 2 short lines and an uneven circle. To capture the correct angle of the cat's back leg, yous desire these two lines to be angled towards the front of the cat's trunk. You lot also desire to make sure that the uneven circumvolve faces forwards.
At this stage of the how to draw a realistic cat tutorial, yous should start to encounter the basic shape of your cat coming together, and it should look something like our example below.

Stride 7: Constructing the True cat'due south Tail
It is now time to describe the construction line that you will utilise to depict the tail. For the tail, you lot tin can but use a unmarried curved line, extending from just above the dorsum signal of the trunk oval. For that signature curved tail, describe the line then it looks slightly like a "ii."

Stride 8: Drawing Your Cat's Ears
This is the last construction step earlier we move on to create the final outline for your drawing of a cat. The perfect placement for the cat's ears is right on the top of its head, just after the top point of the caput oval. Brainstorm past drawing a pointed triangular shape on the top of the cat's head oval, so draw a slightly more rounded i behind it.
You want to make sure that the front end ear overlaps the back one, to get the perspective right.

Footstep 9: Fine Lining the Outline of Your True cat Drawing
Afterward all these steps using structure lines, it is finally time to put them to use and draw the final outline for your drawing of a cat. The best identify to begin cartoon your outline is at the head. Using the oval shape to assist you, trace the ears and so flatten the elevation of the head slightly, before dipping downwardly into the oval just a touch on. You can then follow the bottom of the head curve, creating a slight bump for the nose. After you lot have outlined the chin, have the line directly across to meet the main body oval just beneath the front indicate.
You lot can follow the other construction lines pretty closely for the residuum of the outline. For the cat'due south tail, outline the structure line on either side. Do not be afraid of not sticking to the construction lines perfectly, a few bumps and curves will add together texture and realism to your drawing of a cat.
Y'all can use short pilus-like strokes to complete some of the outlining to give the impression of fur. Along the abdomen in detail, yous can make the furry lines a little longer. For added realism, draw a few curved lines to separate the toes in the paws.
One time you are happy with your outline, yous can erase all the remaining structure lines.

Step 10: Adding Texture and Details
At present that you have your outline fatigued, you can move onto calculation texture and facial details. This stride is the first of two detailing stages, and the second will exist done with paint.
To create the centre of your cat cartoon, begin past drawing a tilted "Five" shape and calculation a half-circle inside of it. After you take drawn the circle, colour in a smaller circle to create the iris. Use a few very small streaks to create a modest eyebrow above the eye, and do the same below the eye for some texture. Add some more small lines to represent the nostrils, and around the nose, you lot can describe some whiskers.
Throughout the remainder of the cat's torso, use short strokes to create the impression of fur.
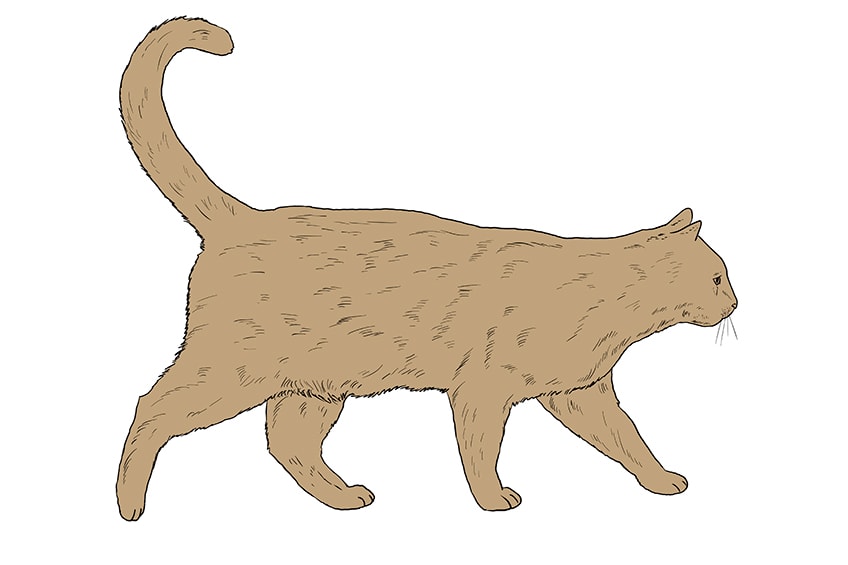
Step eleven: Adding the Get-go Coat of Color
The cat drawn is a tabby, but if yous want to capture your own pet'south unique coloring, this is the pace where you have artistic liberty. If you are going to requite your cat tabby coloring, you can follow along with us and use a light chocolate-brown shade equally the base of operations color for the whole body.
Y'all desire this first coat of color to be light, every bit you volition apply a couple of darker shades to add together the design in the side by side few steps.
Step 12: Adding the Second Coat of Colour
For this next coloring step, you need to choose a calorie-free greyness color. Add a very light coat of this color to most of the true cat'due south body, leaving areas of the light dark-brown shade effectually the true cat's nose, under its abdomen, and around its legs.
At the end of this step, your true cat's coloring should expect a lilliputian something like this.
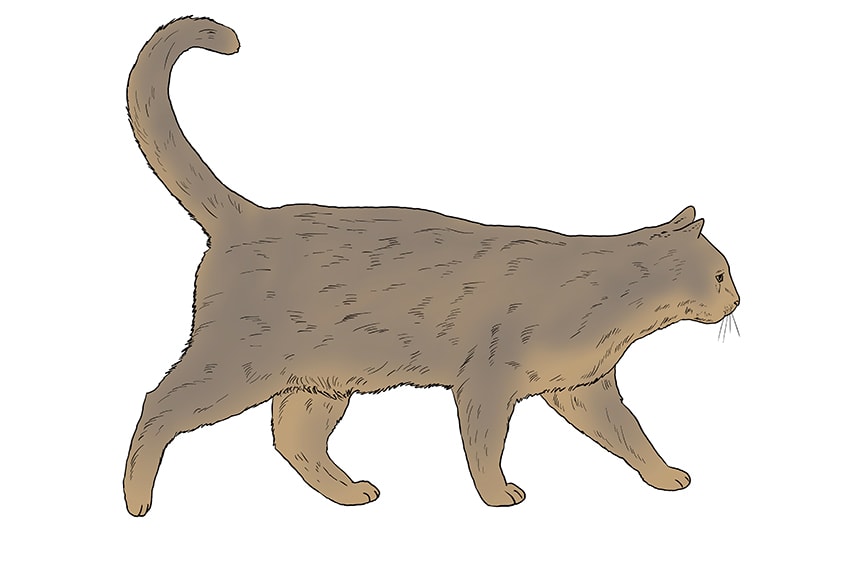
Pace thirteen: Blending Shades and Calculation the Third Coat of Color
Using a soft castor, lightly add a third glaze of a slightly darker shade of brown. Over again, similar the grey, you want to focus most of this brownish on the upper one-half of the cat, leaving the lighter brown shades on the bottom.
For a realistic fur effect, yous tin can make this coat a lilliputian more patchy. Patches of lighter and darker color help to make your cartoon of a cat more realistic.

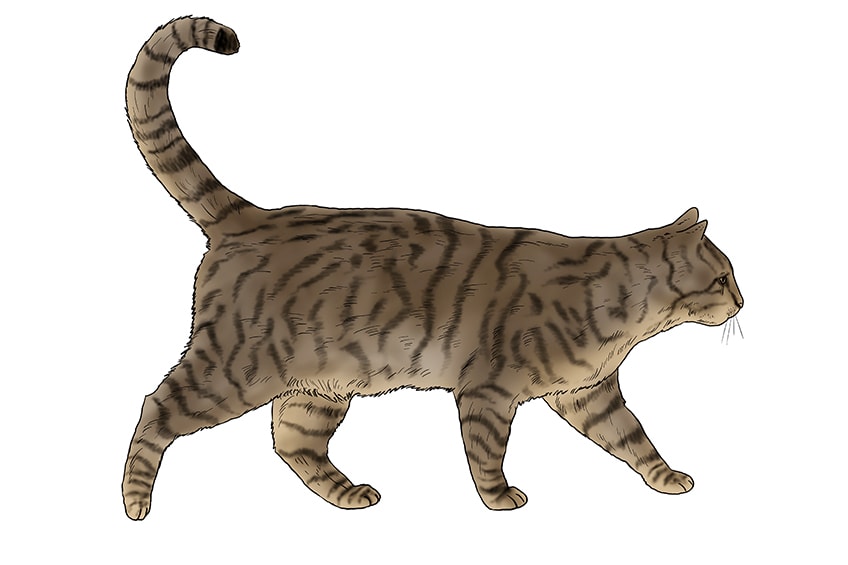
Footstep 14: Adding the Tabby Stripes
Tabby cats are known for their tiger-like stripes, and then to make your drawing more realistic, you can utilise a darker shade of grayness or black to create these stripes. You want your stripes to be very narrow and quite parallel. Y'all do non, however, desire to have pure parallel stripes all the manner down your cat's body. Brand some of your lines slightly curved, put some in a unlike direction, and brand sure that none of them are joined together.
To make the stripes on the tail and legs wait realistic, draw them horizontally then that they wrap around the legs and tail.
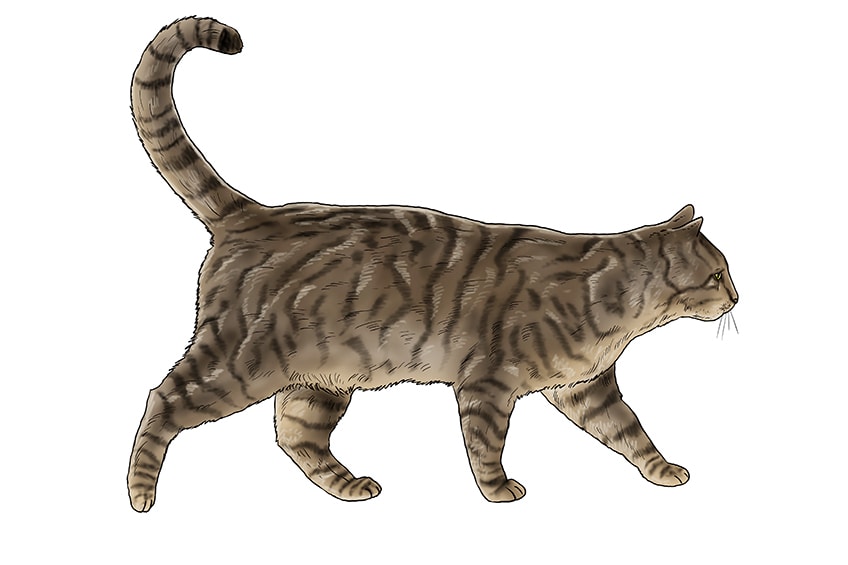
Step 15: Adding Highlights
To make whatsoever drawing look realistic, it is essential that you add highlights and shadows. These two tools assistance requite your drawing dimension and perspective. Using a lite cream shade, follow some of your tiger stripes, to help contour the appearance of your cat. You can use the cream shade to blend out the lighter areas of color nether your cat's abdomen and face, and along the top of your cat's back.
When it comes to adding hightlights, it tin can be helpful to decide where your light source would be in your composition. If, for example, your light source is above the true cat's head, you could add highlights to the meridian of the cats head, along its dorsum, and on its tail.

Step 16: Adding Shading
In this final step, you are going to employ a shadow shade of dark grey or black to exercise the opposite of what you did for the highlighting. Add full general shading on the parts of the true cat'due south body that would exist shielded from your light source, like under the optics, on the back of the neck, behind the legs, on the tail, and on the within of the legs.
Be very conscientious with your shading, as too much shadow can very quickly ruin a good drawing. You can always add more, only it is very difficult to take information technology away.
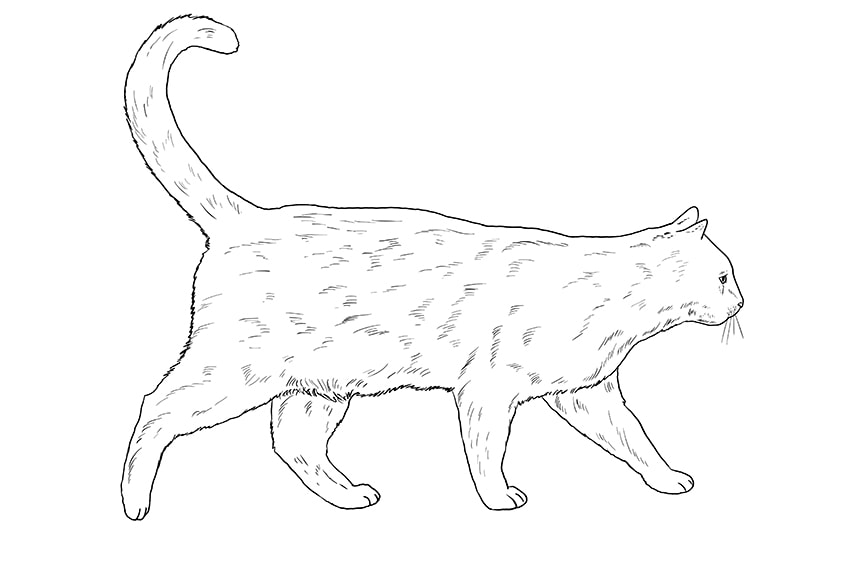
Just like that, yous take successfully completed our in-depth how to draw a realistic cat tutorial. Hopefully y'all are happy with your last cartoon and you accept had the chance to practise some essential cartoon and coloring skills. It is so easy to create a true cat drawing when yous take it step-by-pace, and now you take all the knowledge to describe cats in a range of other positions and patterns.
Frequently Asked Questions
Does It Take a Lot of Time to Make a Cat Drawing?
Not at all. In fact, it might take you much less time than yous would wait. With our in-depth cat drawing tutorial, y'all tin can easily and quickly create a realistic cat drawing. If this is your first time drawing animals of any kind, the tutorial may take a piddling longer, merely through this process, you will learn some important cartoon skills.
Tin You Use Paint to Complete this Tutorial?
Absolutely! You tin complete this tutorial using any medium you similar. If you are a graphic artist, you tin can hands adapt this cat drawing tutorial for a cartoon tablet, or you can utilise pigment, colored pencils, or pen and ink.
DOWNLOAD HERE
How to Draw a Furry Cat Head TUTORIAL
Posted by: faithfachaps.blogspot.com
How to Draw a Furry Cat Head TUTORIAL. There are any How to Draw a Furry Cat Head TUTORIAL in here.

